Overview/Introduction
Audacity is a free software that can be used to record and edit podcasts.
Details
Creating a Podcast Using Audacity
1) Download Audacity at https://www.audacityteam.org/download/
a. If you are using a Windows computer, click on Audacity for Windows, then Audacity Installer. Choose Audacity Windows Installer from the list.
b. If you are using a Mac computer, click on Audacity for MacOS, then the Audacity dmg file. Choose Audacity macOS DMG from the list.
2) Run the Setup Wizard to install the app on your computer.
3) Open Audacity.
4) Under "Audio Setup", make sure the speakers listed under Playback Device and the microphone selected under Recording Device are the ones you want to use. It should default to your computer’s speakers and internal microphone. You will want to change the microphone if you are using an external one.

5) Select the red Record button.

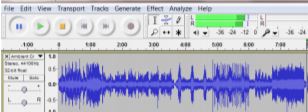
6) You should see the sound waves moving in the middle of the screen as you record.

7) Click Pause (the two blue lines) if you need to take a break; then click Record when you are ready to resume recording.
8) When you are finished recording, click the Stop button.

9) If you recorded your audio already and want to bring it into Audacity, click File > Open and find the file on your computer.
10) To join two or more audio clips together, click File >Open again. Copy the second audio clip by selecting CTRL-A (Command-A on a Mac) on your keyboard, then CTRL-C (Command-C on a Mac). Minimize this screen and return to the original screen. Navigate to the end of the first audio clip and move the playhead line there. Then select CTRL-V (Command-V on a Mac) to paste your audio clip into Audacity. Repeat for each additional audio clip.
11) To play multiple pieces of audio (e.g. a voice recording and music) at the same time, click on Tracks > Add New > Stereo Track. Click on the appropriate place within a track and hit the Record button to record on that track (alternatively, you can copy and paste audio onto that track). Repeat for the other tracks.
12) You can edit your recording by using the options under the Generate and Effect tabs.
a. To delete portions of the recording, highlight the appropriate section and select the Delete button on your keyboard.
b. To add silence in the middle of a podcast, highlight the appropriate section, click Generate > Silence, and then OK.
c. To shorten the amount of silence or pauses in your audio, highlight the appropriate section and click Effect > Special > Truncate Silence. Click OK.
d. To remove background noise, highlight a section of your track and click Effect > Noise Removal and Repair > Noise Reduction. Choose Get Noise Profile and play a few seconds of the audio (preferably a section with loud background noise). Then highlight the entire recording and select Effect > Noise Removal and Repair > Noise Reduction. Click OK.
e. To adjust the volume, highlight the appropriate section and click Effect > Volume and Compression > Amplify. Use the slider to adjust the volume, then click OK.
13) If you have music you want to include or underscore your audio file, click File > Open and find the music file on your computer.
a. The music will need a control track (the original spoken track) to create the volume change. The Control track must be below the music track. To move the track, select the down arrow next to the track name and select, Move Track Up.

b. To have the music underscore your recording, highlight the track you want to adjust. Then use the Auto Duck feature in Effect > Volume and Compression > Auto Duck.

c. This effect will Duck (lower the volume) the music under the control track, then adjust the volume back up at the end of the dialogue or control track.

d. Select Apply and the program will adjust the volume on the track.

13) Save the project by clicking File > Save Project if you need to continue editing the project on the same device and you have multiple tracks. If you need to continue editing but you want to access it on a separate device, export the recording by clicking File > Export and choose WAV file. When you are ready to upload the recording somewhere, choose File > Export and save as an MP3 file.
You can use Spotify for Podcasters to host your podcast.
See Also